SSH Port Forwarding Guide
Contents
Setting up proper port forwarding for SSH connections, servers or just test purposes is crucial but isn’t as straight forward as your connection should be. This post aims to be a quick guide for different use cases.
Quick and easy solution ngrok
tl;dr for a quick solution use ngrok - it’s free, stable and works right out-of-the-box without any further trouble.
Foreword
What do we want to achieve and why? That’s something I frequently miss when browsing through official Ubuntu documentations so I will keep it low-level here and out of the perspective from a non-IT but tech-savvy person.
The aim
We want to be able to have public access to our device, meaning that you could access your device through the WWW anywhere from the world.
What for?
- Remote SSH access to your machine, e.g. when in holidays don’t carry your big server with you but just a compact laptop. The heavy calculations can be done at home while the laptop only needs to serve as a nice frontend for example when working with jupyter. However, the best approach is to keep your electronic devices off when in holidays! 🏖️
- Setting up an http-server for your web-apps or a database. Awesome for testing purposes and when your on low-budget!
1 The quick and easy approach with ngrok
If you just want to test something, show your colleagues your latest web-app or frequently change network like e.g. when working from home, work or a friend’s place ngrok can be the right solution. It doesn’t require any particular network setup and only needs two things:
- a free ngrok account
- the ngrok client on your host
On your host computer (the one you want to get access to; Linux):
| |
SSH from your guest computer (the one you have physical access to; same command for Linux/Windows):
| |
Or for a web-app just use any browser:
| |
Cons
- every time you shut down the client, you will be assigned a new route and port (just leave it open if it’s an issue)
- depending on your connection might cause a little delay when typing (in my case not notable)
Ngrok conclusion
Ngrok is amazing. It’s simple, straight-forward and does just what it’s supposed to. Some people claim, they had open and working ngrok connections for as long as a year! It’s totally free so just give it a try!
If you feel more like self-building there is an open source alternative.
2 The proper way to go: port forwarding
If you want the proper setup, there are a few steps involved and depending on your provider and your devices there might be some trouble to get it working. Let’s break it down. There are three different instances that we need to take a look at.
Your server - can be your computer/laptop/raspberry pi
Your local network, router and provider
The accessing machine
Principles
When you connect to the internet, you will be assigned an IP that serves as an identifier. You can access that IP through any browser. Let’s check it through any of the “whatsmyip”-sites on the web, e.g. https://www.whatismyip.com.
Your IP-Adress is 12.34.567.89
Most likely those site will only return your IPv4-Adress - the old IP-Standard from the times when there weren’t so many devices on the web as it’s technically limited to 32-bit (2^32 = 4.7 billion) adresses. The newer standard is IPv6, uses letters and numbers and is 128-bit. A nice read on the two standards can be found here.
So if you type in this IP adress in your browser you will see … nothing. Of course, as you didn’t start any server and didn’t tell your router what to do if it receives a request.
In order to do so, some steps are necessary.
1) Server setup
If you want to use SSH, make sure that the ssh client is running. If you want to serve some html, make sure the server is running. SSH usually uses port 22, python servers 8000, hugo 1313, rails 3000 and postgres 5432. Those are the default ports but can always be altered by binding them to another port. The flag depends on your actual server but usually is similar to
| |
or uses a -b or -p flag.
Mobile testing
When I have a server running but want to access it in my local network only, usually you need to bind it to 0.0.0.0 in order to access it from a different device on the same network. E.g. when I want to test this hugo blog on my phone I just bind the server like this:
| |
Just use ifconfig (Ubuntu) or ipconfig (Windows) command to find out your local IPv4-address usually starting with 192.168.1.*** and enter this IP plus the standard port 1313 in your browser like this
| |
and you should be able to see the site!
2) Router setup
Alright, so our server is running and ready to deliver. Only we need to specify that when a request reaches the router, it will be sent to the right device. As the router usually assigns the internal IP randomly we should
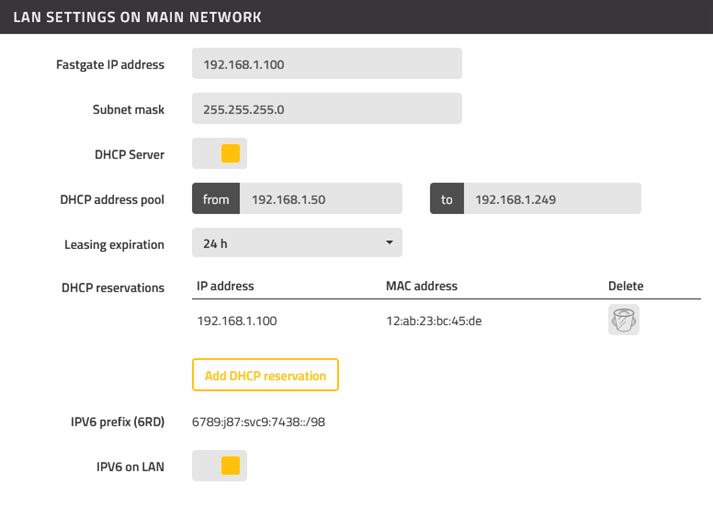
a) set a static internal IP for your server, meaning that whenever this server/laptop whatever is connected to the router it will get the same internal IP e.g. 192.168.1.100. Such a reservation is called DHCP reservation and can be found in the router settings. Look up your model, access it through the respective link and go to the advanced settings section. Those might look different depending on the software and device.
In my case it was called “LAN SETTINGS ON MAIN NETWORK”. There you can choose between the devices and simply assign the number you wish for the device. Easy right?
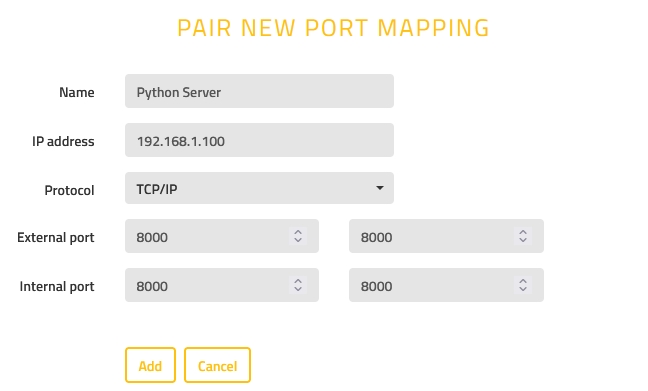
b) Now only the actual port forwarding (also called port mapping) is missing. Still in the advanced settings, just go to the respective settings section. There might be a simplified port forwarding and a “normal” one. If you use the simplified you can choose between the online devices and what for you use port forwarding, e.g. SSH. In case, just stick to the normal one. In my case it looks like this.
So you are saying that incoming requests on your external IP on port 8000 should always go to the internal IP 192.168.1.100. As we just bound a physical device to this IP, the request will always be forwarded to the server and not accidentally go to your smartphone, printer or your friend’s PC. However, even if you did wrong, most likely nothing will happen as the respective wrong device is not accessible on this port.
3) Accessing from outside
There we go! You should be able to access your page under your external IP + the right port, let’s say 12.34.567.89:8000.
IPv4 vs. IPv6
If it’s not working at this point you are most likely lost in translation. IPv4 and IPv6 are different standards only compatible amongst each other. You can’t use IPv4 to connect to IPv6 and vice versa. That’s a pity and really annoying. The only workaround is a) to talk to your provider b) use a proxy with the respective standard.
If you rent a server somewhere most likely they use both enabling you to access with any machine.
4) Handling dynamic external IPs
Hopefully it’s working for you! If you used this method for a couple of days you will have noticed that your external IP is changing. That’s normal but not ideal for our use case. You can simply ask your provider to assign you a static IP which then wouldn’t change anymore. If you cannot or don’t want to, there is the following good option.
Besides the problem of changing IPs, it would be nicer to have some human-friendly URL. Luckily there are free solutions available that tackle both. Such services can be found when googling for “dynamic DNS”. For simplicity and IPv4/6 compatibility I found dynv6 - an easy service that offers you custom sub-URLs such as:
| |
When you sign up online and enter your IP the first time manually, you can access the above URL just as you did before, so
| |
In order to tackle also the problem of changing IP addresses, there are two version:
a) You are lucky and own a modern router such as a Fritz!box. Then you can go to the settings and tell the router to update the changing IP at dynv6. Super convenient and you don’t need to worry about anything.
b) Or you are unlucky and find yourself with a bad router. Still not a big deal, only that your server needs to do the job of updating. Dynv6 offers a simple API. If you download their script it’s as simple as this:
Make the script executable (only the first time):
| |
Update the IP:
| |
Run this script once a day and you should be fine. In case you would like to automatize it, either when booting or with regular intervals, use systemd (for startup calls) or cronjobs for updates e.g. every 60 mins.
Conclusion
If you’re in a hurry just use ngrok. If you’re up for a good solution in the long run, the second method is best. Investing some energy and money in
- a static IP
- a good modern router with good UI and plenty of settings
- IPv4 & IPv6 compatible systems
will definitely pay off in the long run and save yourself a lot of time and frustration. Still, if you’re tight on budget the options presented here are both free and get the job done!

